
Pcbs have become an indispensable part of all major applications. They require continuous and stable operation without any damage. PCBs are composed of numerous components and materials, and are manufactured and assembled following standard processes. During the design, manufacturing, assembly, and testing of PCBs, all critical aspects are strictly controlled to ensure the final product is free of defects. While product-related defects can be controlled, some hidden external factors cannot be directly managed. Storage, handling, and usage methods all impact the product, with the extent of influence depending on the surrounding environment.
Corrosion is one of the external defects encountered by many products, including printed circuit boards. Corrosion is a destructive process where, under specific conditions, the core material reacts with other elements, transforming into another form, thereby impairing the product’s performance. Corrosion can also occur on printed circuit boards, affecting their quality, reliability, and performance. In this section, we will explore the phenomenon of corrosion on printed circuit boards and introduce some practical corrosion removal methods and effective cleaning solutions.
What is Printed Circuit Board Corrosion and Its Causes?
Corrosion is the chemical degradation of metal components. Metals present in PCB assemblies, such as copper, solder, and component pins, can all undergo corrosion. Corrosion products manifest as greenish-blue spots, white powdery residues, dark rust, or other types of abnormal compounds on the PCB surface. Corrosion affects the conductivity and signal integrity of the PCB. It can also form unwanted electrical pathways, leading to overheating, and ultimately cause permanent damage to components and the board.
The causes of PCB corrosion are often improper operation, poor storage, and contact with external factors. One primary cause is high humidity; if a PCB is exposed to a high-humidity environment for a long time, metals will begin to corrode. In marine or coastal environments, salty air accelerates metal corrosion. Pollutants in the air can also affect PCB metals. In battery applications, leakage of alkaline battery electrolyte can corrode PCBs. Therefore, understanding how to effectively remove PCB corrosion is crucial for restoring its reliability.
Corrosion Limits for Stable Performance
Since corrosion is a slow process that doesn’t immediately damage the PCB board, it usually starts from a very small area and expands over time if the corrosion continues. Therefore, it is always recommended to use and deploy PCB boards in a safe environment and regularly inspect for any damage.
The initial stages of corrosion have a lesser impact on the PCB board and can be repaired using appropriate solutions. In such cases, the PCB board’s performance does not degrade significantly and it can continue to be used.
By carefully inspecting the PCB board and its components, if the corrosion is mild, the traces and components are unaffected, and only cleaning is needed to repair the PCB board, but this requires knowing how to properly clean corrosion from the PCB board. However, if the corrosion has eroded major components and traces, and the repair cost is too high or impossible, replacing the PCB board is the appropriate choice.
PCB Corrosion Cleaning Process

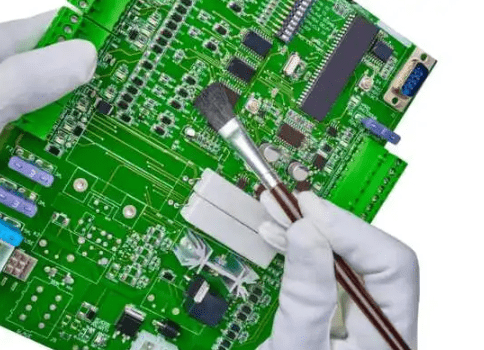
Before starting corrosion cleaning, it is essential to prepare the appropriate tools. Necessary cleaning tools include: Isopropyl Alcohol (IPA), distilled water, a soft-bristled brush, cotton swabs or foam-tipped swabs, and a microfiber or lint-free cloth. The operator must wear a mask, goggles, and gloves. It is recommended for those learning how to effectively clean PCB corrosion to use a dedicated workstation equipped with standard equipment.
1. Analyze the Extent of Damage
Carefully inspect all sections of the PCB board for corrosion. Any residue or unwanted compounds must be removed. A pre-inspection is a necessary step for subsequent operations. Use good lighting and a magnifying glass during inspection. Many guides on how to clean PCB corrosion recommend this step as the foundation for successful cleaning. Internal damage due to corrosion is rare, so a surface inspection is usually sufficient.
2. Remove Loose and Surface Debris
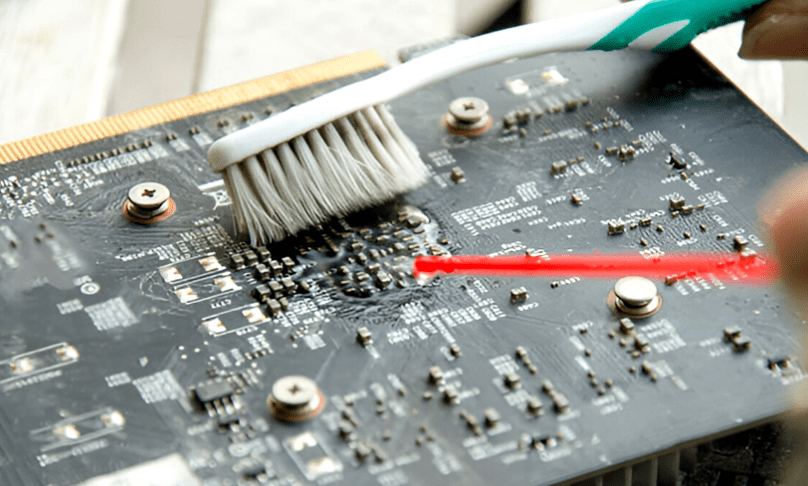
Corrosion forms a layer of brittle compound on the metal surface. During initial treatment, corrosion can be removed by clearing loose surface corrosion. Use a soft-bristled brush to gently brush away the corrosion. For deep and critical areas, compressed air with a precise airflow can also be used.
Always avoid excessive force, remove only the existing corrosion, and ensure not to damage other components on the PCB. Technicians often emphasize the importance of gently cleaning corrosion from PCBs, avoiding unnecessary pressure.
3. Apply IPA and Rinse
Isopropyl Alcohol (IPA) is a commonly used cleaner in printed circuit board (PCB) manufacturing and is effective at removing corrosion. The main advantage of using IPA is that it does not react with PCB components and can thoroughly remove unwanted substances. Dip a soft brush into the IPA solution (90% concentration is recommended) and apply it to the corroded areas. Gently scrub until all dirt is removed.
Several attempts might be necessary to completely remove the corrosion. After the corrosion is removed, rinse the PCB with distilled water. For PCBs with complex structures, ultrasonic cleaning is recommended for thorough rinsing. Using regular water is not advised as it may contain other contaminants. This step demonstrates another key aspect of professionally cleaning PCB corrosion.
4. Drying
After cleaning and rinsing, the PCB board must be dried. Cleaning agents and water might remain on the PCB board and cause damage during operation. Use a lint-free cloth to wipe the PCB board, or use a hair dryer to blow it dry. To speed up drying, low-temperature drying within a set temperature range can also be used. Even if the best PCB corrosion cleaning steps are followed, improper drying cannot ensure the reliable performance of the PCB board.
5. Recertification
Cleaning the PCB board or attempting any repair operation might affect the basic characteristics of the PCB board. Carefully check for any remaining corrosion and inspect other parts or components for damage. Replace damaged components and solder the PCB board. Electrical parameters must be revalidated before use.
Detailed Steps for Personal Corrosion Removal
Before starting, prepare the following tools and materials:
- Personal Protective Equipment: Safety glasses, gloves (nitrile gloves are best).
- Cleaning Tools: Cotton swabs, soft-bristled brush (old toothbrush or paintbrush), lint-free cloth (e.g., microfiber cloth).
- Cleaning Solvents: Isopropyl alcohol (IPA, 90% concentration or higher is best), distilled water, white vinegar (or citric acid solution).
- Neutralization & Auxiliary Tools: Baking soda, precision tweezers.
- Repair Tools: Electronic contact cleaner/restorer, PCB conformal coating.
Step 1: Safety Preparation and Initial Assessment
- Power Off & Discharge: If the PCB is part of any device, completely disconnect all power sources, including batteries. For large capacitors, discharge them using a resistor.
- Visual Inspection: Carefully inspect the PCB under good lighting to determine the scope and severity of the corrosion. Identify corroded components, traces, and pads.
- Document with Photos: Take photos before handling for reference if connections need to be restored.
Step 2: Physical Removal of Dry Corrosion
Corrosion products are usually white, green, or blue powder or crystals.
- Use a Soft Brush: Use a dry, soft-bristled brush (like an old toothbrush) to gently brush off loose corrosion powder. Be gentle to avoid sweeping corrosion into clean areas.
- Use Cotton Swabs: For stubborn chunks, use cotton swabs to gently scrape them off. Caution: Excessive force might damage already fragile components or traces.
Step 3: Chemical Cleaning and Neutralization
This is the most critical step and requires selecting the method based on the type of corrosion.
- Scenario A: For Alkaline Battery Leakage (Most Common Corrosion)
Alkaline battery leakage (KOH) is basic and requires a weak acid for neutralization.- Use White Vinegar or Citric Acid Solution: Dip a cotton swab in a small amount of white vinegar or diluted citric acid solution and gently apply it to the corroded area. You will see slight fizzing, indicating neutralization is occurring.
- Let it Sit and Scrub: Let it work for 30 seconds to 1 minute, then gently scrub the corroded area with the cotton swab.
- Thorough Rinsing: Crucial! Acidic residue itself can corrode the board. Immediately use cotton swabs dipped in distilled water to repeatedly rinse the area, thoroughly removing the neutralized products and excess acid.
- Scenario B: For Acidic Pollutants or Uncertain Type
If the corrosion source is uncertain, or it’s general grime, use high-concentration Isopropyl Alcohol (IPA) directly.- Use IPA: Dip a cotton swab or brush in IPA and scrub the corroded area. IPA effectively dissolves many organic residues and evaporates quickly, leaving no traces.
Step 4: Deep Cleaning and Drying
- Comprehensive Cleaning: Regardless of the method used, after completing local cleaning, it’s advisable to perform a thorough cleaning of the entire PCB board using a soft brush and a generous amount of IPA. This removes all remaining chemicals and dirt.
- Thorough Drying: This is key to preventing secondary short circuits.
- Preferred Method: Use a compressed air can or the cool air setting of a hair dryer to blow dry all liquid from the circuit board.
- Natural Drying: Place the board in a well-ventilated, dry area for at least 24 hours to ensure complete drying. Placing it in a container with silica gel desiccant can speed up the process.
- Auxiliary Method: Use a paper towel to gently blot large areas of liquid, but be careful not to leave lint.
Step 5: Inspection and Repair
- Re-inspection: After the board is completely dry, carefully inspect the previously corroded areas.
- Trace Damage: Check if copper traces are corroded and broken. If broken traces are found, use fine wires for jumper connections, or carefully scrape off the solder mask over the trace and reconnect it with solder.
- Pad Damage: If component pads have lifted, you may need to run jumper wires to other available solder points on the component or other connection points on the circuit.
- Component Damage: Check if nearby resistors, capacitors, etc., are also corroded and need replacement.
- Restore Conductivity: For corroded switches, potentiometers, or connectors, after ensuring their physical structure is intact, use an electronic contact cleaner/restorer to spray and clean them, restoring conductivity.
- Protective Coating (Optional but Recommended): For PCBs used in harsh environments, or to prevent future corrosion, apply a layer of PCB conformal coating over the cleaned and repaired areas to form a protective film.
Important Notes and Taboos
- [Taboo] Do not use tap water: Minerals and impurities in tap water can cause electrochemical migration, leading to new short circuits.
- [Taboo] Do not use strong acids or bases: Such as hydrochloric acid, sulfuric acid, or strong alkalis, as they can severely damage the PCB’s copper layer and substrate.
- [Taboo] Do not use excessive force: Corrosion makes copper traces brittle; vigorous scraping can easily cause traces to lift off.
- [Caution] Regarding baking soda paste: Online advice sometimes suggests using baking soda (a weak base) to neutralize battery leakage (a strong base). This is chemically less logical. While it might clean through abrasion, it may not thoroughly neutralize. White vinegar (a weak acid) is a more scientifically sound choice.
- Testing: Before reinstalling the PCB into the device, if possible, use a multimeter to test for shorts between key points and check if the power-to-ground resistance is normal.
Summary Process
Assessment → Physical Removal → Chemical Neutralization/Cleaning → Thorough Rinsing → Complete Drying → Inspection & Repair → Protective Coating
By following the steps above, you have a good chance of successfully saving a corroded PCB board. If the corrosion is very severe or involves precision/expensive equipment, it is advisable to seek help from a professional repair technician.
How to Prevent PCB Corrosion
Besides learning how to remove PCB corrosion, we also need to know how to prevent PCB corrosion during the manufacturing process.
- Store PCB boards in a dry, temperature-controlled place and package them properly. It is recommended to use silica gel desiccants in the packaging.
- Avoid using bare PCB boards in humid environments. PCB boards should have a suitable IP rating.
- Clean PCBs regularly to prevent pollutant buildup.
- Apply conformal coating during the PCB manufacturing process and reapply it after any repair attempts.
- Must check batteries for alkaline leakage. It is recommended to remove batteries from old devices.
Conclusion
Potential design and manufacturing defects in PCBs can be systematically identified, corrected, and controlled. However, unexpected and randomly occurring issues like corrosion require additional handling and attention. Completely controlling environmental factors is impossible.
Only product safety features and correct usage methods can resist the phenomenon of corrosion. In this context, knowing how to remove PCB corrosion is crucial for maintaining its long-term reliability. PCB designers are working on developing more neutral PCB materials to address these issues.


0 Comments